Hunting the Wolf
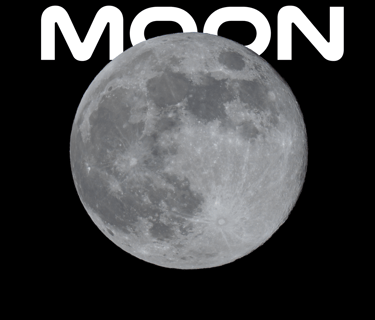
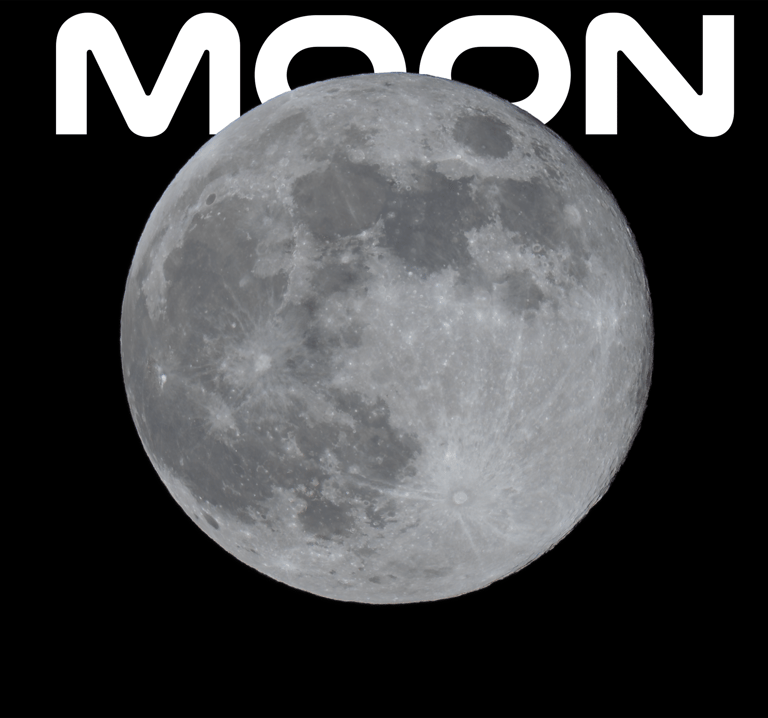
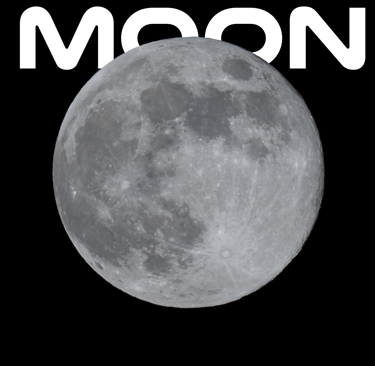
Capturing the First Full Moon of 2026 from Horbury.
STREET PHOTOGRAPHY
Date: January 3, 2026 Location: Horbury, Wakefield Gear: Sony A7R V + Sony FE 200-600mm G OSS
Let’s be honest—the British weather doesn’t care about celestial events. The forecast for the first full moon of 2026 (the Wolf Supermoon) was typical for a January night in Wakefield: freezing cold, damp, and frankly, a bit rubbish.
I was standing in Horbury on the night of the 3rd, looking up at a sky that couldn’t decide if it wanted to be cloudy or clear. It was a "shit night" for astrophotography by most standards—hazy and turbulent. But when you have a weapon like the Sony A7R V paired with the Sony 200-600mm lens, you don’t need perfect conditions. You just need a tiny window of opportunity.
Here is how I managed to pull a sharp, detailed image of the Wolf Moon out of a messy night.
The Gear: Why this Combo is a Cheat Code
If I had shot this with a lower-resolution camera, I probably would have gone home empty-handed. The magic here lies in the 61-megapixel sensor of the A7R V.
The Lens (Sony 200-600mm): At 600mm, the moon is big, but it doesn't fill the frame. You need reach, and this lens is razor-sharp at the long end.
The Body (Sony A7R V): This is the MVP. Because the sensor has so much resolution, I could crop heavily into the image and still retain incredible crater detail. It allows you to shoot wide enough to find the moon easily, then "zoom in" later on the computer without losing quality.
The Setup & Settings
Shooting the moon is actually like shooting in daylight—it is a giant rock reflecting the sun. If you use "Night" automatic settings, the camera will try to expose for the black sky and turn the moon into a glowing white blob.
Here is the manual recipe I used to cut through the Horbury haze:
Stability is King: Even with the A7R V’s incredible IBIS (stabilization), at 600mm, the slightest shivering from the cold will blur the shot. I locked the lens down on a sturdy tripod.
Shutter Speed: I kept this faster than you might expect—around 1/125s to 1/250s. The moon actually moves across the sky faster than you think; any slower and you get motion blur.
Aperture: I stopped down to f/11. Lenses are rarely at their sharpest wide open. f/11 gave me the "sweet spot" for sharpness across the crater surface.
ISO: Kept low, around ISO 100-200, to keep the noise down.
The Secret Sauce: Focus Peaking
Autofocus can struggle when clouds are drifting over the moon. I switched to Manual Focus and used the A7R V’s Focus Peaking (set to Red). I watched the red highlights shimmer across the crater edges on the rear screen. Once those craters were glowing red, I knew I had critical focus.
Post-Processing: Saving the Shot
Straight out of the camera, the raw file looked a bit flat because of the atmospheric haze (that "shit night" I mentioned).
In editing, I did three main things:
The Crop: I cropped roughly 50% of the frame away. Thanks to the 61MP sensor, I still had a massive file left.
Dehaze & Clarity: I bumped the "Dehaze" slider up to cut through the thin cloud layer that was softening the details.
Contrast: Increased the contrast to make the "seas" (the dark patches) pop against the bright highlands.
The Result
Despite the cold fingers and the fighting with the clouds over Wakefield, the Wolf Moon came out looking majestic. It’s a reminder that you don't always need clear skies or a trip to a dark-sky reserve. Sometimes you just need the right glass, a high-resolution sensor, and the patience to wait for a 10-second break in the clouds.
Next up: Keeping an eye out for the Find X9 Ultra pre-orders in March—that periscope zoom might be the next best thing for a pocket moon-shooter!
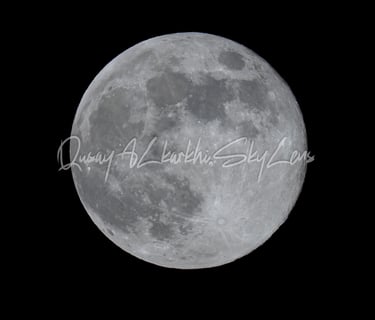
Gallery
The Final Best Moon shots